Manuals
Editing selected questions – Changing question settings and statuses
Having selected questions in Questions, you can view the actions you can perform on that selection by clicking the lightning bolt icon in the yellow area on the left side of the screen in the item bank.
![]() The full list of available actions looks like this:
The full list of available actions looks like this:

The steps that follow explain the ‘Change the settings’ action and how to change the ‘Question Status’.
-
Step 1
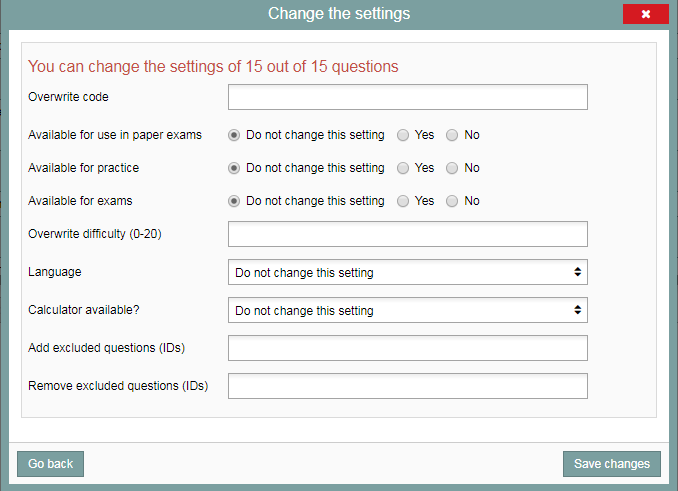
Question settings – Change settings
- From the list of actions, select ‘Change the settings’.
- You will see the screen from the screenshot below.
- From here, you can change the settings you enter when you create a new question for the questions in your selection.
- Enter the desired changes.
- When you finish, click ‘Save changes’ in the bottom right corner of the pop-up window.
-
Warning! Before you make any bulk changes to question settings, please consider that any changes you make (like overwriting the code/identifier) will apply to all questions in your selection. You risk losing things like the current names of questions or calculator use settings.
-
Step 2
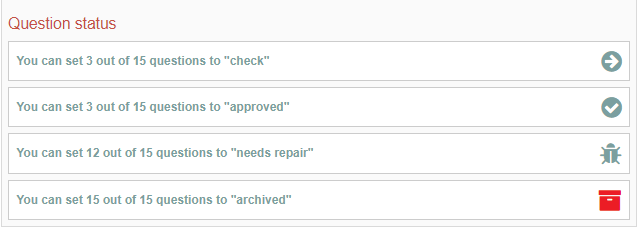
Changing the question status
Under the ‘Question status’ header, you can change the status of selected questions. To do so, click the desired option. This is what the options mean:
- You can change the status of Draft questions to Approved. Approved questions can be included in recipes.
- Draft questions can be changed to Check. This option only applies if you’re not a teacher and/or don’t have an author profile and are, for instance, entering questions on a teacher’s behalf.
- Approved questions can be set to the Needs repair status. This is useful if there are questions you want to review and temporarily stop using in recipes.
- You can set the status of questions with any status to ‘Archived’.
When you select an option, you can (but don’t have to) add a reason for the change that will be saved in the question history.
- Finally, click ‘Confirm’.