
Manuals
Recipe: creating a recipe in ‘Tests’
This page explains how to create a recipe.
-
Step 1
Creating a recipe
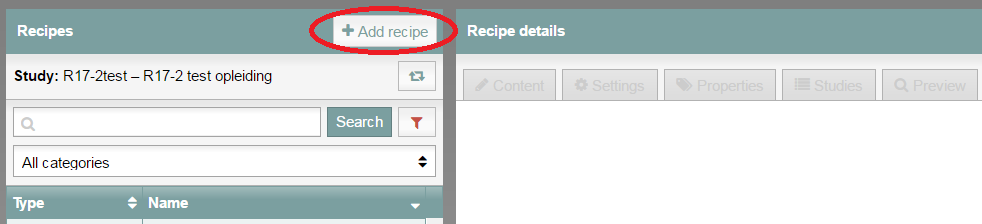
- Log in to admin view.
- Go to Tests.
- On the left side of the screen, click ‘Add recipe‘.
-
Step 2
- The settings screen for the exam opens automatically.
-
Step 3
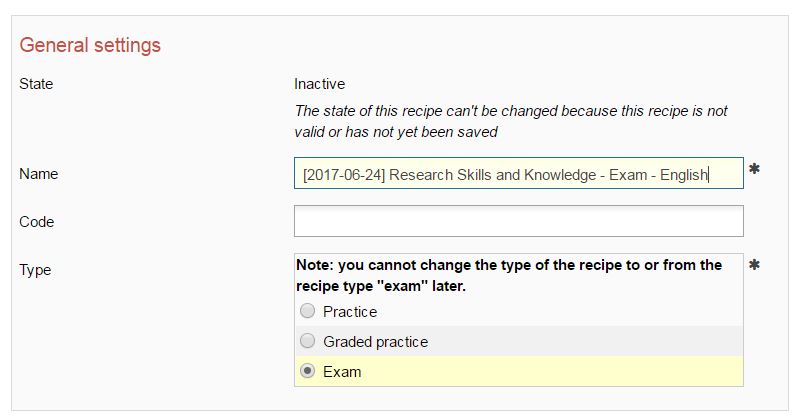
General settings
-
- State: This can be set to active or inactive. When status is set to active, the recipe will be visible in student view.
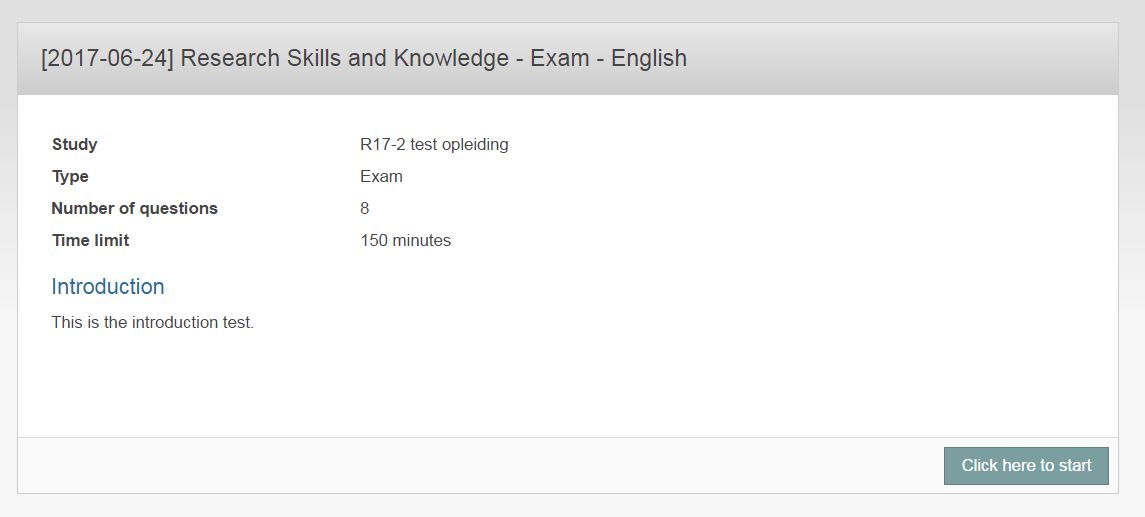
- Name: Name your exam here. The correct way to name an exam is to start with the date (year, month, date) in square brackets, then the course name, a dash, the type of exam, and finally any additional information: [yyyy-mm-dd] course name – exam type – additional information.
Example: [2017-06-23] Research skills and knowledge – DT 1 – English. - Code: Indicate a code with which your support (key use/functional management) can quickly find your exam. The best format would be: yyyy-mm-dd/coursecode
- Type: Indicate what type of test this is. For summative assessments, select the ‘Exam’ option.
-
-
Please note that once you’ve selected the ‘Type’ of test (Practice, Graded practice, or Exam) and saved the ‘Settings’, the only change you will be able to make to the ‘Type’ is to switch from ‘Practice’ to ‘Graded practice’ and back.
-
Step 4
Settings for exam (top part of the image)
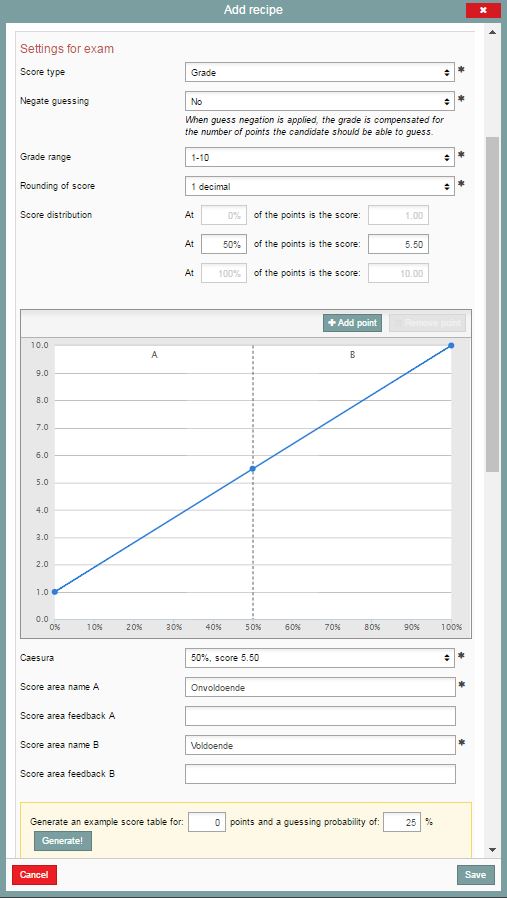
- Score type: Decide how you want to evaluate the exam. The options are grades, points (on a scale of 0 to 20, for instance) or percentage. There are various settings you’ll need to configure for each type.
- Negate guessing: This setting instructs Remindo to automatically correct for the odds of guessing correctly. If you’d like to see the exam’s guessing score, go to the Example tab after saving the recipe settings. The total guessing score across all exam questions will be listed at the top.
- Grade range: Here, you can configure whether grades will range from 0 to 10 or from 1 to 10.
- Round off scores: Fill in your preference.
- Method of rounding off: You can choose between: regular rounding off rules; Rounding down; Rounding up; Rounding down the score if the score is below the caesura.
- Score distribution: This is where you equate percentages of correct answers to a score or grade. The editable field is essentially the same as the caesura: “What percentage of the exam must the student have answered correctly to achieve a 5.5 out of 10?”
-
Step 5
Settings for exam (top part of the image)
- The graph is a visualisation of the score distribution. You can adjust the range by moving the blue dots in the graph around. If you’ve already corrected for chance, don’t correct for it again in the graph!
- Caesura: the pass/fail line when it comes to grading the test.
- Score area name: a score area is the area between two blue points on the graph. You can assign names to each one. The Remindo defaults are ‘Onvoldoende’ (fail) and ‘Voldoende’ (pass).
- Score area feedback: You can link feedback to each score area. The text you enter will be shown to the student when they log in to see their results, provided that setting has been enabled.
- Generate score table: This will show you an overview of the number of points a student must collect to achieve a given grade.
-
Step 6
Retry settings
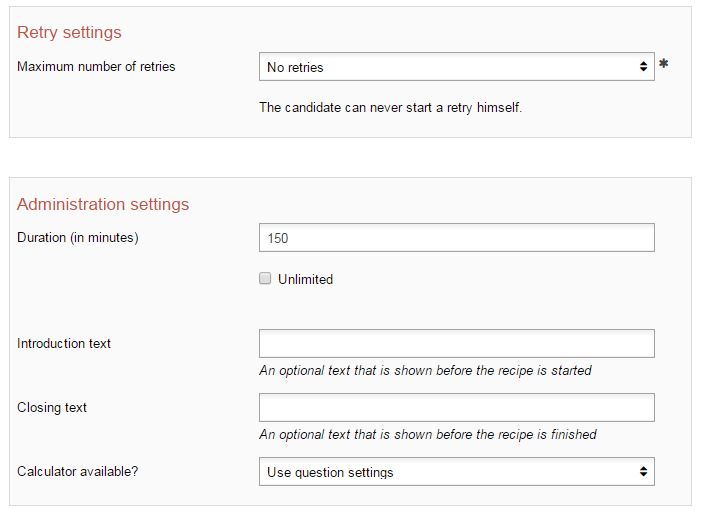
- Retry settings: How many times can the student resit the exam? During a retry, the student performs the exact same exam you constructed in this recipe.
- If you want to disallow students from taking the exact same exam more than once, set maximum number of retakes to No retries. Students can never start a retry themselves.
- Advice: In practice, it is conventional to set the option ‘maximum number of retries’ to ‘no retries’ in case of an exam (graded). We would also advise you to do so. Retries can best be prepared in the online testing environment as a new ‘Exam’ and only link those who are allowed to retry. Your key user can either do this for you, or you can agree that you will do so yourself. For this ‘exam’, you will have to create a new recipe under a unique name.
-
Step 7
Administration settings (see previous screenshot)
- Duration: Set the maximum duration for your exam. Tell your faculty key user about students who should receive extra time. The key user will ensure that they get it.
- Introduction text: Students will see this text before they start the exam. This introduction text is analogous to the text on the cover page of a paper exam. At any point while performing the exam, the student can return to review the introduction text.
- Closing text: Students will see this when they finish the exam.
- Under Show calculator aid?, select whether to use the setting in the question, never to show the calculator (ignores question settings) or to make either the simple or scientific calculator available at will.
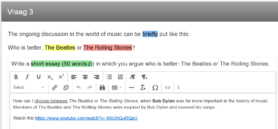
- By selecting text marking available, candidates can be given the possibility to mark text in a case text or in the entire question. These markings can be text markings, font markings, settings for paragraphs, and colour tagging the question. Candidates cannot colour tag their own answers, and the markings are not visible when correcting the answers.
-
Please note: When the time for the exam elapses, the exam will close down immediately after showing a message. The students’ information will be saved. In Remindo, students who started the exam late will have the same amount of time as students who started on time.
The candidate’s text and colour markings may look like the following:
-
Step 8
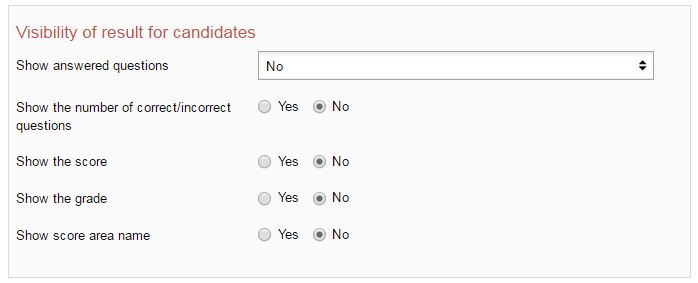
Visibility of results for candidates
- Show answered questions: This determines whether students will be able to see the questions after the exam. If they are allowed to see the questions after the exam, you can configure whether they should also be allowed to see the correct answers to the questions.
- Show the number of correct/incorrect questions: Shows the number of correctly/incorrectly answered questions.
- Show the score: shows how many points were awarded.
- Show the grade: shows the grade on the overview.
- Show score area name: this option refers to the ‘Score area name’ fields (Voldoende/Onvoldoende) underneath the graph.
Also see Visibility of results to students.
-
The results can be made available either immediately after the exam or at some later date. Your key user can configure this for you.
-
Step 9
Delivery settings: these settings apply to student view, which is where the exams are performed.
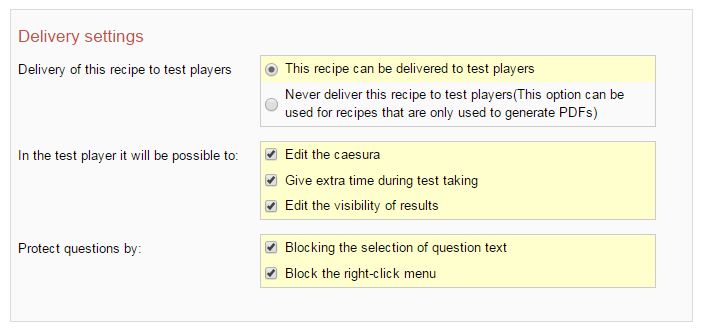
Delivery of this recipe to test players:
- This recipe can be delivered to test players: the exam can be performed in student view.
- Never deliver this recipe to test players: The exam can never be performed digitally because it cannot be delivered to student view.
In the test player (student view) it will be possible to: Always check the following options:
- Edit the caesura: This leaves you with the option of adjusting the caesura after the exam has been performed.
- Give extra time during test taking: This leaves you the option of assigning students extra time during the performance of the exam.
- Edit the visibility of results: This leaves you the option of having the key user change who can see the exam results and when.
Protect questions by:
- Blocking selection of question text: Students will be unable to copy questions or other text in Remindo.
- Blocking the right-click menu: Students will be unable to open the right-click menu during the exam.
-
Step 10
Save recipe
- When you have configured your recipe, click Save at the bottom.
-
-
Step 11
The recipe settings can always be altered at a later date:
- Login to the Admin view.
- Click on Settings to get to the recipe menu.
- The settings will now pop up.
- Execute your alterations.
- Don’t forget to Save the recipe afterwards!
