Manuals
Recipe: feedback (see scores for specific exam sections)
On the Feedback tab of the recipe, you configure feedback categories for tracking results on different parts of the exam separately. This is good way to see at a glance which sections of the exam your students did especially well or poorly on. Sections can be made up of question tags and/or series of questions from specific ‘Rules’ in the recipe.
It is possible to set a different caesura for each section of the exam. The end result will be calculated based on the compiled caesure.
Examples:
- Say you had your students perform a linguistics exam in which you added the tags Spelling and Grammar to questions on the exam that concern those subjects. This will allow you to see how each student scored on both Spelling and Grammar.
- If your exam includes multiple-choice and open questions, you can configure it so that the students’ scores on the multiple choice section will be visible even before the open questions have been checked.
-
Step 1
Terugkoppeling toevoegen:
- Click the Feedback tab.
- Then click Add section in the right-hand corner.

-
Step 2
A new screen will open. This is where you configure for what part of the exam (properties or specific questions) you want tracked separately.
-
Step 3
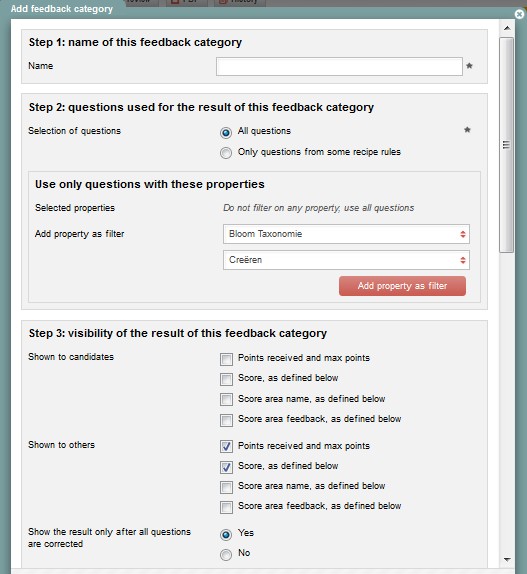
Step 1: Name of this feedback category
- Name: Type the name of the section for which you want to able to see scores after the exam. Tip: Consider using a name that describes the property you want feedback on.

-
Step 4
Step 2: Questions used for the result of this feedback category
- Selection of questions: Choose how to determine which questions will have their scores tracked separately.
– All questions: All questions with the selected property will be included in the calculation of the score.
– Only questions from some recipe rules: Only questions that have the selected tag and come from recipe rules you select will be included in the calculation of the score. - Only use questions with these properties: Select one or more question properties. Only questions that have those properties will be included in the calculation of the score.
- Selected properties: If you do not want to filter for question properties, this will say ‘Do not filter for question property, use all questions.’ In this case, ‘All questions’ means all questions or the questions from the rules you previously selected.
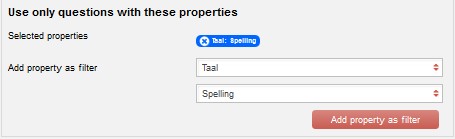
- Selected properties: If you do want to filter for a property, this field will show the property being filtered for.
- Add property as filter: Select the property you want to filter for and click Add property as filter.
- The tag you add will appear in a blue label. In the example, that tag is ‘Spelling’ (see image).
- Selection of questions: Choose how to determine which questions will have their scores tracked separately.
-
Please note! If you want to know how your students are doing on various subjects (properties), you will have to add a new feedback category for each one. When you add multiple properties, Remindo will filter out all questions that have one or more of those tags. You will not learn anything about the individual tags. Remindo will add the scores from all of those questions together.
-
Tip! Do you not want to filter using tags? Please tick the following box: Only questions from certain recipe rules (under step 2), and tick which Rules you want to select. In order to do this, you must have already added rules to your recipe.
-
Step 5
Step 3: Visibility of the results of this feedback category:
- Shown to candidates: Configure how much information the students will be allowed to see about their score after the exam. Checkmarks you place here will be automatically placed under Shown to others as well.
- Shown to others: Configure what you yourself want to be able to see about this score after the exam.
- Points received and max points: This is the score received for the property and/or questions you selected.
- Score, as defined below: Placing a checkmark here allows you to determine under Result settings (step 4) how you want to view scores (grade, percentage or points).
- Score area name, as defined below: Placing a checkmark here allows you to decide in the Result settings (step 4) what to call the score ranges (A and B) in the Graph. You might, for example, call score range A ‘pass’ and score range B ‘fail’. The student will only see one of these, determined by which range their score falls in.
- Score area feedback, as defined below: Placing a checkmark here allows you to give the students feedback in Result settings (step 4). What feedback they see depends on the score range their scores fall in.
-
Step 6
Step 4: Result settings
- This is where you configure the graph and set score ranges and the caesura. If ‘Score area name’ and/or ‘Score area feedback’ were checked in Step 3: Visibility of the results of this feedback category, you can enter decriptions here. For an explanation of the settings in Step 4, we refer you to the section on Exam settings in the item Recipe: create.
-
Step 7
- Click Save when you have finished entering your feedback.
- An overview of all added sections will pop up.
-
Step 8
Have you set a different caesura for each section? Go to the tab ‘Settings’ and choose ‘Compiled caesura’.
- Score type: choose Grade, Percentage, or Points.
- Round off score: Choose in how many decimals the grade should be rounded off.
- Method of rouding off: Choose in what way the grade should be rounded off
- Breakdown of end result: Here you can set the breakdown of the end result, i.e. how much each section counts towards the end result.
- Passing grade mandatory? Assign for each section if the student should receive a passing grade for that section to be able to pass the exam.
-
Step 9
Student view (after exam perfomance)
You can find the feedback after exam performance in then student view by clicking on ‘Results’, ‘Analyses’, and then selecting the concerning recipe.
The overview will show the status of each question per feedback/exam section, either showing whether they have been answered correctly (green, mostly correctly (light green), incorrectly (red), mostly incorrectly (light red), of have not been corrected yed (blue). The end result is also shown using these colours. If one or more questions belonging to that section still have to be corrected, the result will not be shown (it will remain blue entirely).
Based on each form of feedback/exam section, it is shown how many passes and how many fails are the result of the exam. Feedback/sections that have not been dealth with yet are not taken into account when calculating the amount of passes and fails.
-
Step 10
Example:
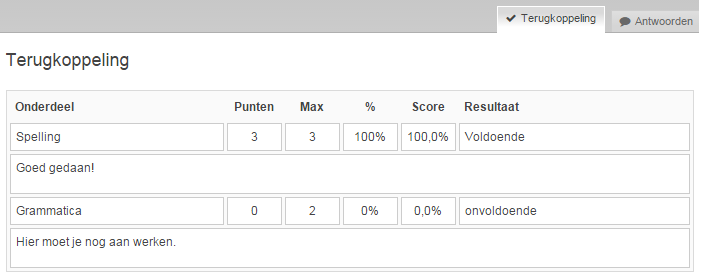
When clicking on the chart icon next to a student, the achieved percentage per section and the achieved score will be shown for this student. (Click on ‘Feedback’ if that tab was not selected yet.)
Feedback on results after an exam has finished (see image; example in Dutch).