
Manuals
Correcting open questions: starting a round of corrections
After the exam, it’s time to correct your students’ answers. To do that in Remindo, you have to start a round of corrections. To configure a correction round, you need to enter your ‘Correction round settings’ (rules for the correction process) and ‘Distribution settings’ (who will do the corrections).
Your key user will be able to explain all these settings and enter them for you. An explanation of each setting is also presented below. If you want to start your corrections as soon as the exam is finished, be sure to communicate your corrections preferences well before the start of the exam.
If you’d prefer to configure the settings yourself, please confer with your key user first.
-
Please note! Do not configure or reconfigure the ‘correction round settings’ or the ‘distribution settings’ during an exam. Also refrain from changing any settings after you and/or your colleagues have started correcting.
This will help prevent the corrections process from going off the rails.
-
Yes you can.
Once all questions have been corrected in the first correction round, you can create a new one. Reasons you might want to do that include problems with the first round or the desire to have a second corrector go through the exams as well. When you start a new round of corrections, the scores and feedback assigned in earlier rounds will not be lost or overwritten. It’s possible to use different settings in different correction rounds.
Starting a new correction round is done exactly the same way as starting the first one.
-
Step 1
Correction round settings
- Log in to student view.
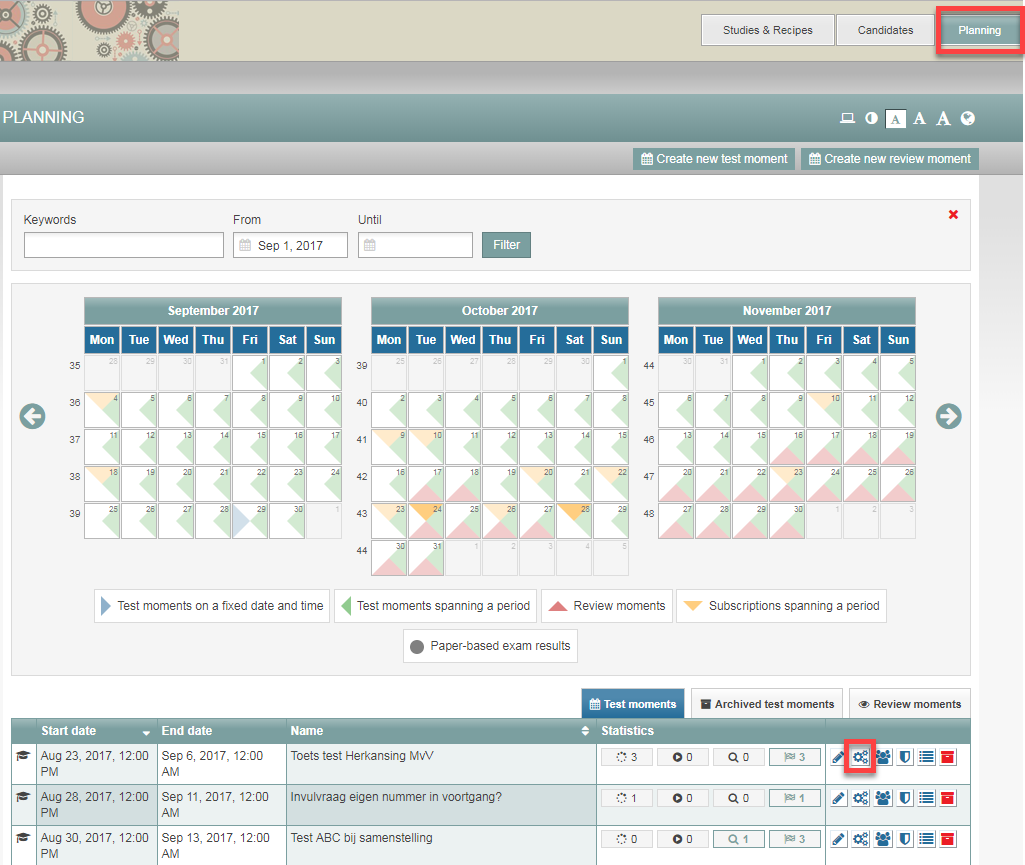
- Click the Planning tab and find the exam you want to start a round of corrections for in the overview.
- When you find your exam, click the gear icon next to (Edit subscription settings).
-
Step 2
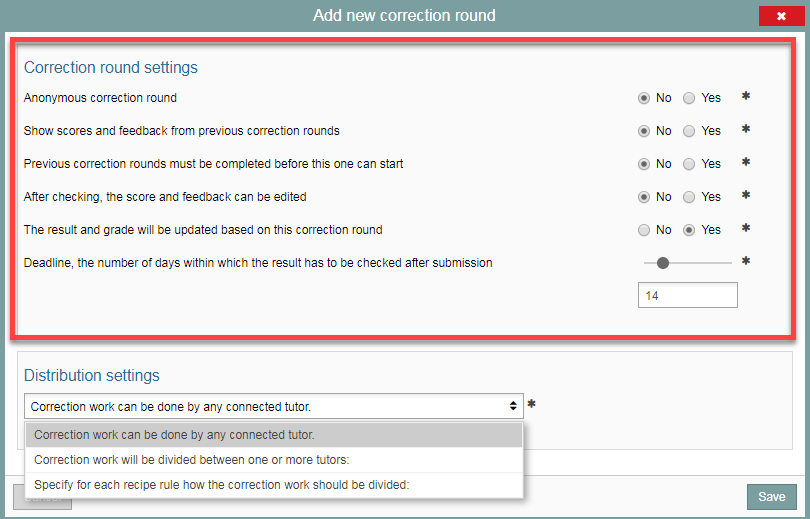
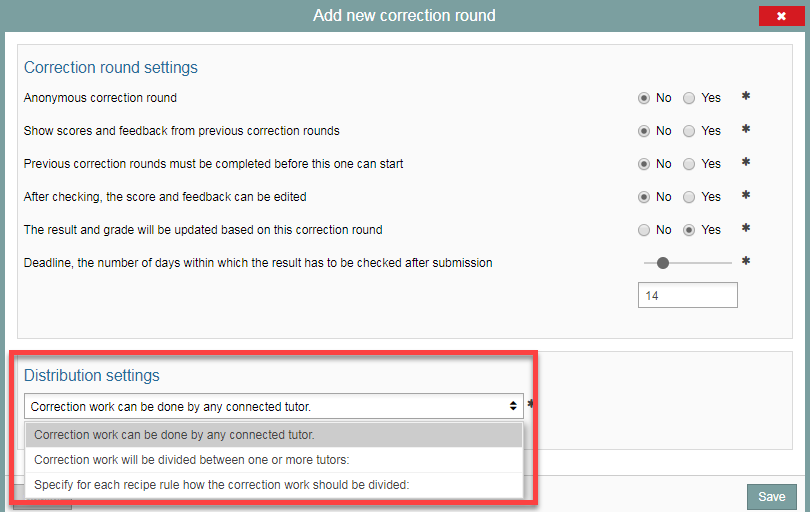
- The subscription settings screen will open. It will include a Correction rounds section.
- Click the button marked +Add correction round to create a new correction round. See image.

-
Step 3
A new screen with correction round settings will open. Below is a description of what each setting does:
- Anonymous correction round determines whether the exams should be labeled with the student’s name during correction.
- Show scores and feedback from previous correction rounds: If this is set to Yes, whoever is performing a second (or later) round of corrections will be able to see the scores and feedback left by previous correctors. No hides these older scores and feedback.
- Previous correction rounds must be completed before this one can start. When this is set to Yes, The supervisor/corrector will not be able to start working until all previous corrections rounds have been concluded. If this option is set to No, the supervisor/corrector can start correcting immediately, even if earlier rounds of corrections are still ongoing. We strongly advise that you set this option to ‘No’.
- After checking (*), the score and feedback can be edited. With this option set to Yes, the supervisor/corrector will be able to edit the scores and feedback he gave at a later date. Setting it to No prevents them from doing so, even within the same round of corrections, even if the round of corrections hasn’t been concluded yet. (* ‘after checking’ = after submitting all scores and feedback)
- The result and the grade will be updated based on this correction round. When you set this option to Yes, the student’s grade and result will be based on this correction. This is automatically true for the first correction round. When you create a second round of corrections and select Yes, the grade and result from that second round will be used. This will be indicated by a green checkmark next to the grade.
If you select No, the grade/result from the first round will remain valid and the grade will not be automatically changed based on the second round of corrections. You will be able to manually indicate for each student whether their grade should be based on the first or second round, or even use the average of the two. There is a page on changing student grades over multiple rounds of corrections that explains how to do this. We strongly advise that you select ‘Yes’. - Deadline, the number of days within which the result has to be checked after submission. Use this option to indicate how many days the corrector(s) will have to check the exams. The maximum setting is 60 days. If the deadline is missed, a red triangle will appear next to the recipe in the Check answers overview. Questions can still be checked after the deadline has passed.
-
Step 4
When choosing a distribution, you should consider whether you:
- Want to check the open questions one exam (i.e. student) at a time or one question at a time. Checking one question at a time allows you to assign specific questions to specific correctors, though that does require that you create a separate rule for each question in the recipe.
- Want to check the questions by yourself or with multiple correctors and, it it’s the latter, who the other correctors will be.
Prevent issues during the correction process by carefully configuring the distribution. The table in the next step will tell you how.
-
Step 5
Distribution settings:
The distribution settings let you determine which tutors are allowed to correct work and even which tutor will check which question. The different options are explained below:
Distribution settings: Function: Consequence: Option 1: Correction work can be done by any connected tutor:
When you select this option, any tutor can correct the exam, provided they are linked to the correct academic programme and to the candidates/students (directly or through a candidate group). Please note: Once you start correcting a candidate’s work, you are linked to that candidate as a tutor for corrections. Other tutors will no longer be able to correct this candidate’s work (unless a new correction round is created). Option 2: Correction work will be divided between one or more tutors:
*A connection between the tutor and candidate must exist. Default is No.
Select this option to manually designate the tutors who may correct the exam. Tutors so chosen must be linked to the academic programme and the candidates/students Please note: RemindoToets will automatically and randomly distribute students among the linked tutors. You cannot influence how this distribution will work out, regardless of whether you choose Select tutors or The tutors connected to the following candidate groups. Option 3: Specify for each recipe rule how the correction work should be divided:
*A connection between the tutor and candidate must exist. Default is No.
You have the choice here of whether to distribute the rules from your recipe among various tutors and/or not to link each recipe rule to a specific tutor but leaving it open to tutors connected to the academic programme. Please note: We advise that if you select this option, you specify for each and every rule in the recipe which tutor should correct it. When you assign a recipe rule to two or more tutors, Remindo will randomly assign students to those connected tutors. *A connection between the corrector and the candidate must exist. Yes or No.
This option will appear when you select either Correction work will be divided among the following tutors or Specify for each recipe rule how the correction work should be divided.
Set this option to Yes when you want to decide ahead of time which tutors will correct which students. The students will be distributed (by the key user) into candidate groups to which the tutors will be linked. Setting the option A connection between the tutor and candidate must exist to Yes makes Remindo use this classification.
Tutors will now only be linked to candidates in the candidate groups to which the tutors are connected. If the tutors are connected to students though any other candidate groups, those connections will not be considered (were the option set to No, tutors could indeed be linked to these other students for correction and the distribution would be largely ignored).
-
Step 6
- Click Save when you’ve finished setting up your correction round.
- The correction round has been set up. You’ll see a few different icons in the correction round. Hovering over those icons will show you which options you selected.
- You can change or configure these settings both before and after the performance of the exam by clicking the pencil icon.
- Click the flowchart icon to view the distribution settings.
